How to Pack and Move Musical Instruments Safely

Picture this — moving day is here, your guitar is in a cardboard box, and the moving truck just hit a speed bump. One wrong move can crack a bridge, warp a neck, or shatter a cymbal worth thousands.
Musical instruments are not regular household items — and the damage that happens during a poorly planned move is almost entirely avoidable. A cracked bridge, a warped neck, or a shattered cymbal are not accidents; they result from skipped steps and wrong packing fragile items techniques.
This guide covers exactly how to pack and move musical instruments safely — from preparation and packing by instrument type, to loading, transport, and unpacking — so your instruments arrive in the same condition they left.
1. Prepare Before You Pack
Preparation prevents damage. Before touching a single instrument, complete these three steps.
Sort Instruments by Size, Type & Fragility
Group your instruments before gathering any materials:
- Small & medium: Flutes, violins, guitars, clarinets, harmonium
- Large & bulky: Pianos, drum kits, tubas, tanpura, veena
- Fragile: String and wind instruments — highest damage risk
- Sturdy: Brass and percussion — more forgiving but still need care
Create an Inventory List
Document every instrument before packing:
- Note make, model, and serial number
- Photograph each instrument from multiple angles
- Store the list and photos separately from the instruments — useful if damage claims arise — having home relocation insurance adds an extra layer of financial protection.
Gather Packing Materials
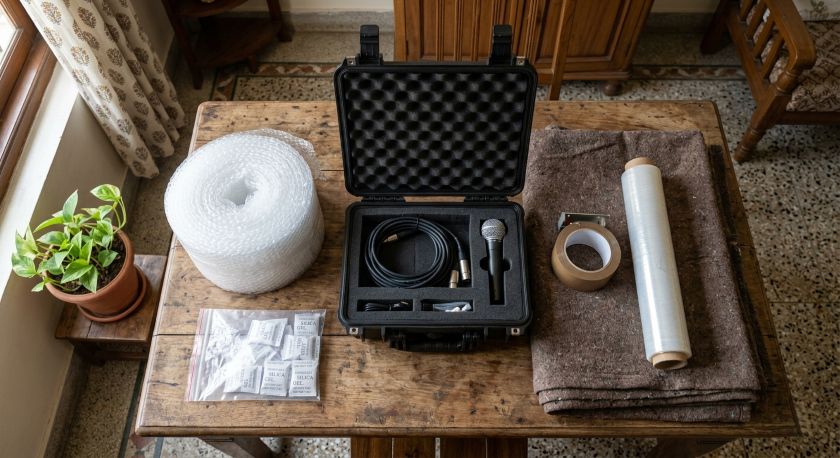
Collect these before you begin packing: Collect these before you begin packing — here's a full breakdown of types of packing materials to help you choose right.
| Material | Purpose |
|---|---|
| Bubble wrap | Primary cushioning for all instruments |
| Packing paper | Gap filler inside cases and boxes |
| Moving blankets | Wrapping large instruments |
| Hard cases | Best protection for string and wind instruments |
| Packing tape | Sealing and securing |
| Silica gel packets | Controls humidity inside cases during transit |
| Stretch wrap | Securing blankets without touching instrument surface |
Account for Climate & Humidity
This step is missing from most moving guides — and it causes real damage.
2. Packing by Instrument Type
Each instrument family has specific vulnerabilities. Follow the method for each type precisely.
Detune
Loosen strings slightly to reduce tension on the neck during transit. Do not remove strings completely.
Disassemble
Remove chin rest (violin), endpin (cello), tailpiece if removable. Place each part in a labeled zip-lock bag inside the case.
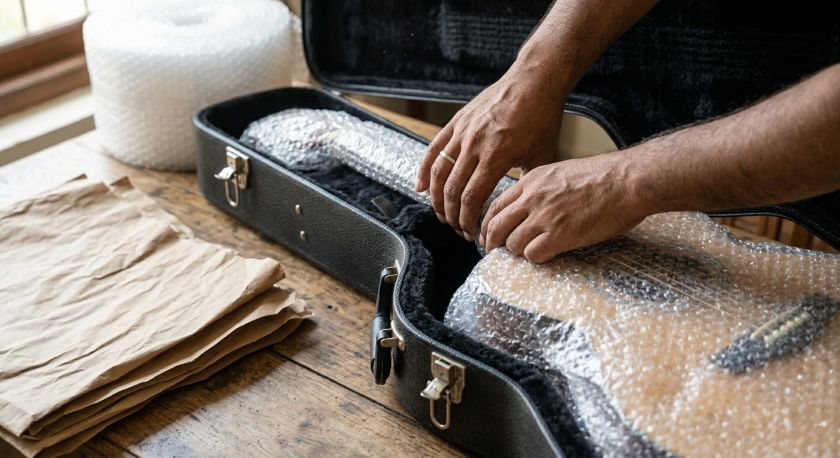
Wrap
Wrap the body and neck separately with bubble wrap. Pay extra attention to: neck joint, bridge, headstock — the most vulnerable points.
Case & Box
Hard case is strongly preferred over a soft gig bag. If unavailable: double-box with minimum 3 inches of padding on all sides. Fill all gaps — zero movement allowed. Label: FRAGILE — STRING INSTRUMENT — DO NOT LAY FLAT
Disassemble Fully
Break down into all individual sections as the instrument allows.
Clean & Dry
Wipe each component with a dry soft cloth. Remove all moisture — sealed packing traps humidity which damages pads and keys.
Reeds Separately
Pack reeds in their dedicated case or a rigid container. Reeds crack under even light pressure — never wrap them loose with other components.
Wrap & Case
Wrap each component individually in bubble wrap. Place in original case with all components in correct slots. Fill gaps with soft packing paper. Label: FRAGILE — WIND INSTRUMENT
Clean
Wipe down entirely with a soft cloth. Remove oils and moisture before sealing in packing.
Disassemble
Remove mouthpiece — pack in a separate labeled bag. Remove all slides — critical step most people skip. Wrap each slide individually in soft tissue to prevent rattling.
Protect Valves
Valves are the most sensitive part of any brass instrument. Wrap each valve individually with soft cloth before placing back in position. Do not leave valves loose inside the case.
Case & Box
Place in hard case, fill all gaps, close securely. Box the case with padding on all sides. Label: FRAGILE — BRASS INSTRUMENT — KEEP UPRIGHT
Electronic Keyboards
Disassemble
Remove stand, pedals, sustain pedal, and power cords. Bag and label all accessories separately.
Protect Keys
Lay a soft cloth or keyboard cover over the keys before wrapping.
Wrap & Box
Wrap fully in moving blankets and bubble wrap — cover all corners. Use stretch wrap to secure — never tape directly on the keyboard surface. Label: FRAGILE — KEYBOARD — THIS SIDE UP
Acoustic & Digital Pianos
- Lock the keyboard lid or cover keys with a soft cloth
- Wrap entirely in moving blankets, covering all corners and legs
- Secure with stretch wrap — not tape on the surface
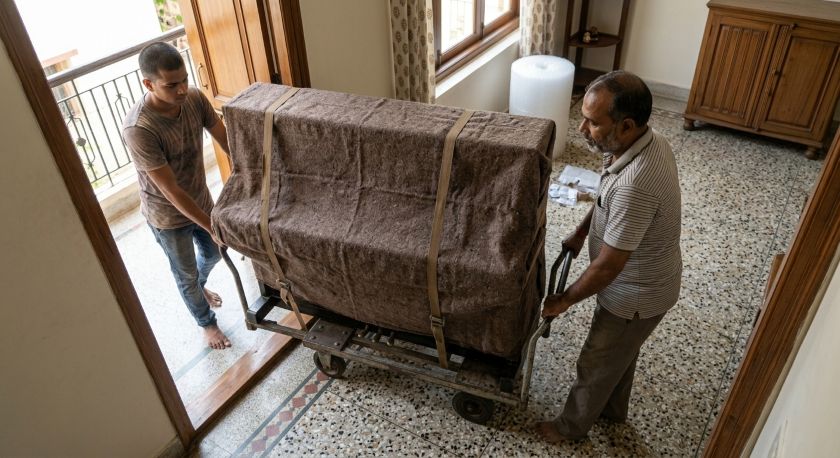
- Upright piano: Minimum 2 people required; use a piano dolly
- Grand piano: Requires professional movers — legs must be removed and the body laid on its side with specialist equipment. Do not attempt without professionals — read our detailed guide to pack and move a piano safely.
Disassemble Completely
Separate drum shells, cymbals, hardware (stands, hi-hat clutch, bass pedal), and drumheads.
Protect Drumheads
Wrap each drumhead individually — they crack and dent from point pressure. Never stack heavy items directly on a drumhead.
Wrap Cymbals
Each cymbal wrapped individually in bubble wrap. Use a dedicated cymbal bag or hard case — cymbals crack when edges contact each other under pressure. Never stack unwrapped cymbals.
Hardware
Place all stands, pedals, and bolts in a hardware bag. Wrap protruding parts in packing paper to prevent scratching shells.
Box
Box shells and cymbals separately. Fill all gaps. Label every box: DRUM SHELLS / CYMBALS / HARDWARE
Original Packaging
Original box with foam inserts is the best protection — use it if you have it. If not available: measure the unit and cut custom foam inserts to fit a new box.
Cables & Accessories
Remove and bag all cables separately — label each cable. Remove any detachable knobs or faders if possible.
Wrap
Use anti-static bubble wrap for all electronics — standard bubble wrap can generate static. Wrap each unit individually.
Box & Environment
Electronics are highly sensitive to heat — never leave them in a hot vehicle. Transport in your passenger vehicle with climate control during summer. Label: FRAGILE — ELECTRONICS — KEEP IN CLIMATE CONTROL
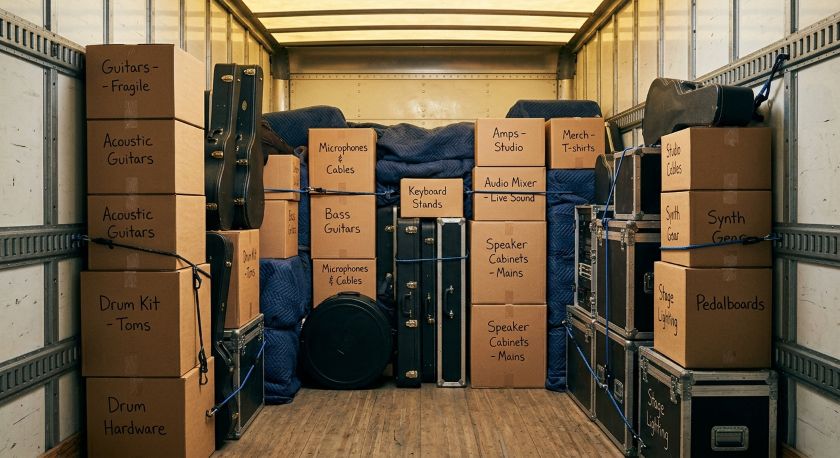
3. Loading & Transporting
Packing is only half the job. How you load and transport determines the outcome.
Loading Order
- Never stack anything on top of string or wind instrument cases
- Keep all instruments upright in their natural orientation where possible
- Leave space between boxes — instruments must not contact each other during transit
Securing Inside the Vehicle
- Use straps or bungee cords anchored to truck wall hooks
- Do not overtighten straps across delicate cases — firm, not crushing
- Fill gaps between boxes with moving blankets or towels
- Before starting: push every box firmly — nothing should shift
Temperature Warning
4. Unpacking & Reassembling
Arriving safely is not the finish line. Unpacking incorrectly causes as much damage as poor packing.
Unpack Slowly
- Remove packing materials carefully — no tearing or rushing
- Inspect every instrument immediately under good lighting
- If damage is found: photograph before touching further
Acclimatization Period — Do Not Skip
Reassemble in Reverse Order
- Reattach all components in the opposite order of disassembly
- Use the correct tool for each screw or fitting — do not overtighten
- Check that every component is stable before moving to the next
Tune & Test
- String instruments: Retune gradually — strings need multiple tunings over 24-48 hours to settle
- Wind instruments: Reassemble all joints, test keys and pads for function
- Brass instruments: Reassemble slides and valves, oil valves before playing
- Acoustic pianos: Book a professional tuner — every move detunes a piano. This is not optional.
- Play every instrument to confirm sound and playability before considering the move complete
Frequently Asked Questions
Conclusion
Safe instrument relocation comes down to four actions: prepare with the right materials, pack by instrument type using the correct technique, transport with attention to loading order and temperature, and allow wooden instruments to acclimatize before playing. Every step in this guide protects your instrument from the most common and preventable causes of moving damage.
Right materials and inventory before you start
Each instrument family needs its own method
Loading order and temperature control matter
Allow 24-48 hours before tuning or playing
Planning a Move and Need Reliable Hands?
AssureShift's experienced moving team handles relocations across India with the care your belongings deserve.